Set Up Email Account for Sintelix
For users to manage their own passwords and receive email alerts Sintelix must be set up to send email messages. To see or modify email settings you must log in as an administrator.
To change the default password policy settings see Define the password policy.
If you configure LDAP, Active Directory or OAuth User Authentication, the email addresses will be automatically saved into the Sintelix User Profile.
For more information, see:
To set up an email account in Sintelix:
- Create an email account for Sintelix to use.
- Log in to Sintelix as an administrator.
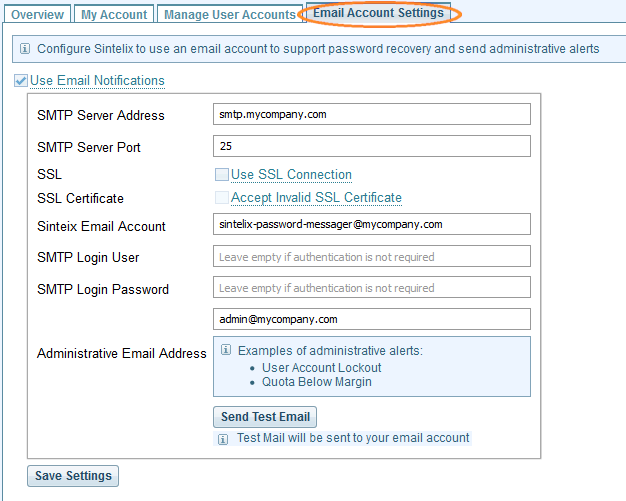
- On the Main Navigation Bar click Admin then click the Email Account Settings tab.
- Select Use Email Notifications then enter your company’s SMTP server details and account details.
- SMTP Server Address is the server Sintelix will use to send email.
- SMTP Server Port is the port used for mail delivery. It is typically 25 or 587, or 465 if SSL is used.
- Check Use SSL Connection if your server uses SSL.
- Check Accept Invalid SSL Certificate if your server uses a self-signed or expired SSL certificate.
- Sintelix Email Account is the email account on behalf of which Sintelix will send its emails. Depending on the SMTP server’s settings, this account may have to have been created within the email system.
- If your email server requires user authentication, enter the details in SMTP Login User and SMTP Login Password fields.
- Administrative Email Address is an email address where administrative alerts will be sent. An example of administrative alert is account lockdown which might indicate a brute force attack on the system. If this field is left empty, administrative alerts will not be sent.
- Validate your settings by sending a test email.
- Select Send Test Email.
- Select Close.
- Check that the email has been received. If it has not been received, revise your settings.
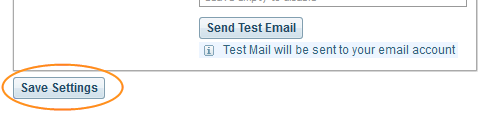
- Select Save Settings.
- Ensure that the email address and associated information for each Sintelix user is correct.
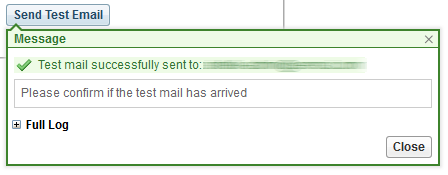
To send a test email, make sure your user account has a valid email address associated with it. Select the User Accounts tab to confirm the emails arrival and change it if necessary.
A message indicates the status of the test message.
Email transmissions are logged and all available information is documented. To view the log click Full Log in the message box.